2011/12/19

Christmas present nails.

Hi guys

today it was the frist day that it really snowed here in zurich. it was finally cold enough for the snow to stay and everything looks like it's covered in powder sugar.

as it's only a week until christmas i thought i would finally decorate my nails in a bit a christmassy way (cool word, huh?)

the christmas present nails !


it's totally easy and fast to make and it looks so cute :)

first start off with base coat ;) haha as always. then do a  french in whatever colour you want. i chose red as it is a christmas colour for me plus i'm in a red phase. let it dry completely. unfortunately i forgot to take a picture but i guess it should be clear how it's done.

then take a nail art pen. i used the essence french manicure & pedicure pen in white. make a cross on your nail. so a vertical and a horizontal line. the horizontal one should be right where your french manicure ends, that way you can also trick a bit if your french line wasn't perfectly straight. add two little rings in the upper part and two short lines in the lower part which will be the ribbon.

et voilĂ , your nails look like little cute presents :) of course you can take any colour you want. that goes for the french and the ribbon colour. 

here are some other pics:


as i thought, hmm, i would kinda like to add some sparkle which totally belongs to christmas in my opinion, i added a little gem on each nail where the knot of the ribbon is.


and those are my final christmas present nails :)

i hope you like them and maybe even try them yourself. let us know how it went or post pictures!

xoxo, 
the beauty

2011/11/17

Star Styles

Outfits of stars we like - and how you style them yourself!


The dog days are over - Miranda Kerr.


Rachel Bilson II.


the joy of summer - AnnaLynne McCord.


crossover - jessica alba.


denim love - sienna miller.


Rachel Bilson.


Summer Style - Kourtney Kardashian.


rock on, the nerd

fall fashion - purple and yellow

Hi guys and girls

So today I looked out of the window and fiiiinally the cloud tap clogging our zurich sky was gone and the shy fall sun could shine again. Everything was glowing in golden and red tones ans the trees have already adjusted their outfit to the season style ;) with the sun shining it's finally a bit warmer again and so ideal for some heavy jumpers and cuddly scarves.
I'm sure some of you, or probably most of you, know the site polyvore.com. It's an awesome page about people creating sets with their favourite clothes, accessories and everything a fashion lover's heart could wish for. I made an outfit a while ago with two of the hippest colours for fall: purple and yellow. So checkout my fall outfit and tell me what you think ;)

love, the beauty


mix it - colour blocking


2011/11/16

Alice in Wonderland Nails

Hey ho.
I KNOW, it's a little late, but we've been busy with university and real life ;)
On Halloween, one of us went as Alice in Wonderland, and the costume wouldn't be complete with the right set of nails, would it?
It's really quick and easy nails, but they look awesome.
So, here we go.

You'll need:
>red polish
>top- &basecoat
>black &white nail art pens

your nails need a certain length, it's really hard to do this one if they're to short.


As a first step, base-coat your nails and let it dry. (as ALWAYS!)
Then, take your red polish and do the first layer of red tips.
Let it dry.
Once they're totally dried, do the second coat.
(if your nail polish is really opaque, then one coat should be fine)


Then, take your black nail art pen and start drawing the symbols of the playing cards randomly.
I did one per nail, except for the ringfinger. Because there are only 4 symbols, I took the white pen and drew all four symbols together on the ringfinger.
I did one symbol per nail, randomly placed.
You can vary as you wish, draw two symbols on one nail, do a big one, a smaller one.. doesn't matter :)


That's what mine looked like.
Seal it with the topcoat and you're done! :)

(Sorry for the bad pictures, had to take them with my phone 'cause my camera was.. unfindeable ;) )

Review on Wholesale-dress.net

Edit: So, I researched and found TONS of bad reviews on the site. Maybe i was just one of the 'lucky' ones, cause my items weren't damaged and pretty good fitting. So, regardless of my review, make your own opinion abut it before you try to order.

Good Morning Bloggers :)
We found a site on the internet, Wholesale-dress.net, which you probably know. At first, we weren't quite sure about it, 'cause we couldn't believe it was that cheap, plus we wondered about the quality of the clothes. So I decided to do a test-order and write a review on it, to help out others that aren't quite sure if they should order something or not.

I rated all the items i ordered by color, material, fit and prize compared to the image that was shown on the page. The rating goes from 1 to 10 points in each category, and the end rating is just the average of the points.


1. Cute Collar Short Sleeve Chiffon Blouse Deep Blue

Prize: ●●●●●●●●●●
1.89$ What can you say.
Color: ●●●●●●●●●◦
The color is pretty accurate, compared to the one on the picture. It's a really nice deep blue.
Material: ●●●●●●●◦◦◦
Also the material is okay, it came with some wrinkles, but thats probably only from being put in a box and beeing shipped halfway around the world. Could be a little softer though. The waves on the collar aren't really there or not that round, plus the white border on the sleeves is just white cloth, it doesn't have this cut in it.
Fit: ●●●●●●●●◦◦
Worn, it doesn't quite look like the one on the picture. For me, it's way too short and the collar is higher than on the picture. Nevertheless, if you stuff it in a skirt or pants, it looks awesome.
Total: ●●●●●●●●◦◦
8 out of 10 points, I'm really happy with it.


2. Korea Flower Collar Off Shoulder Sweater Yellow

Prize: ●●●●●●●●◦◦
7.84$ Prize is low, but in comparison to the other items only gets 8 points.
Color: ●●●●●●●◦◦◦
As you can see in the picture, the color is much more yellow than on the picture, where it's more sandy. But lucky for me, I still like the color :)
Material: ●●●●●◦◦◦◦◦
In the picture, it looks more like sweater material, in real it's more heavy and wooly. It's also a lot more shiny.
Fit: ●●●●●●●◦◦◦
It fits pretty good, but i have no idea how they rolled the arms up like this, it's pretty much impossible because they are too tight. Which is unfortunate 'cause i really liked it that way. Also, it's longer than it looks, but that's not a bad point, so you can wear it with just thights underneath it.
Total: ●●●●●●●◦◦◦
7 out of 10 points. It's still a really nice and unexpectedly warm sweater, which I need now.


3. Leisure V-neck Batwing Sleeve Sweater Red

Prize: ●●●●●●◦◦◦◦
10.54$ Even more expensive than the shoes. But compared to regular prizes for sweaters in Switzerland, still really cheap.
Color: ●●●●●●●◦◦◦
It's more red and less wine than on the picture. But I anticipated with the colors not beeing accurate, so I'm still satisfied.
Material: ●●●●●●●●◦◦
It's a little chunkier than it looks, but still soft and warm material,.
Fit: ●●●●●●●●●◦
It fits exactly like on the picture. The material falls the way it shuld, it's long and comfy and you can wear it any way you want.
Total: ●●●●●●●◦◦◦
7 out of 10 points. I like it, it's a cool sweater, combineable with almost everything.


4. Joker Round Collar Lacing Dress Black

Prize: ●●●●●●●●◦◦
5.84$ Price was okay.
Color: ●●●●●●●●●●
Unfortunately, I have to give it 10 points, because it's black, and I got a black dress.
Material: ●●●●●◦◦◦◦◦
The lace on the dress doesn't look the same. It apears to have a zipper on the back, which it doesnt, so it's hard to get in.
Fit: ●◦◦◦◦◦◦◦◦◦
It's as if it isn't even the same dress as showed on the picture. First of all, it's short, it doesn't even cover my butt. Second, it's thight! I liked about the dress that it's slightly opening at the bottom, but the one I got is skin thight.
Total: ●●●●◦◦◦◦◦◦
4 out of 10 points. If it wasn't cheap and the right color, it would have gotten 2 points max. I can't wear it. Maybe for a smaller person, who likes skin thight dresses, it would be ideal.


5. Elegant Dot Split Joint Chiffon Dress Brown

Prize: ●●●●●●●●◦◦
7.30$ Fair price.
Color: ●●●●●●●●●◦
The colors are accurate, I just have to give it 1 point less because it came with a stain on it. (in the middle of the white part, that small dot is a brown stain.)
Material: ●●●●●●●●◦◦
The material is nice and really similar as seen on the picture.
Fit: ●●●●●●●●◦◦
It looks cute when worn. The belt on the picture is not included, so make sure you have a matching belt, because you'll need it, it's a little bit too loose (at least for me) around the waist. Plus it looks cuter with the belt.
Total: ●●●●●●●●◦◦
8 out of 10 points. Really nice, light dress. Fits good, I can imagine it fitting almost everyone because it's really elastic.


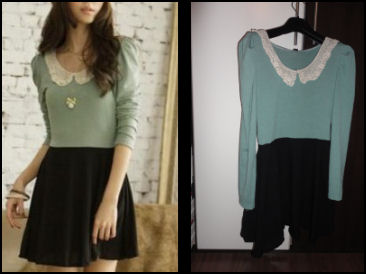
6. Sweet Lacing Collar Color Block Dress Green


Prize: ●●●●●●●●◦◦
8.92$ Fair price.
Color: ●●●●●◦◦◦◦◦
Have to give it 5 Points. It's a lot more blue than mitny, as it is in the sales picture.
Material: ●●●●●●◦◦◦◦
The lace does not look as nice as it does on the picture. The upper part, like the sewater, is really heavy material, and the skirt consists of two layers of really cheap cloth.
Fit: ●●●●●●●◦◦◦
The fit is okay-ish, but not as cute as on the picture shown. The sleeves aren't that puffy, plus you'll need to wear it with a belt, otherwise it looks boring.
Total: ●●●●●●◦◦◦◦
6 out of 10 points. This dress was probably the biggest disappointment, 'cause i was excited for it the most. It's just sad that the colors and the material aren't as i thought they would be.


7. Hot All Matched Elastic Snowflake Imitated Jean Skinny Pants Black

Prize: ●●●●●●●●◦◦
6.49$ Thumbs up.
Color: ●●●●●●●●●◦
The color is really cool and as shown on the picture.
Material: ●●●●●●●●◦◦
The material is good. The waistband is elastic enough to fit in, and the pants consist of two 'layers', like the stretchy jeans layer outside and inside, they have a layer of black fabric, which makes them wearable in colder weather too.
Fit: ●●●●●●●◦◦◦
What can I say. Maybe I misscalculated (I really measured my legs and they were shorter than the length of the trousers described) but the pants are still way too short! At first i was kinda mad, cause i can't wear them with heels, but then i resigned 'cause i have that problem a lot. Plus, the also look awesome with knee-high boots.
Total: ●●●●●●●●◦◦
8 out of 10 points. You get what you see. And the thing about them being too short is more my fault than theirs, so this only weighs in minimally :)


8. Plus Size Tied High Heel Pumps Beige & Black


Prize: ●●●●●●●●◦◦
9.46$ I had to pay 1.50 (or something about that amount) mor because i ordered a bigger size.
Color: ●●●●●●●●●◦
The beige ones have a really nice creamy color! The black ones are more dark grey or anthrazit, but that doesn't bother me personally.
Material: ●●●●●●●◦◦◦
You can see that they are glued, and at some point the glue shows underneath the layers. Otherwise, they surprised me, 'cause for 10$ I didn't expect much. They have like little cushions worked under the sole, which makes them really comfortable to walk in.
Fit: ●●●●●●●●●◦
They fit perfectly! I usually wear size 38/39 (Us size 8), and i read that they come small so I ordered a size 40 (Us size 9) and they fit perfectly. Also, the heel isn't high, so it makes them suitable for daily use.
Total: ●●●●●●●●●◦
9 out of 10 points. I know that's not the average, but less points wouldn't do them justice. They're really awesome and i can only reccommend them!


9. Elegant Pearl Short Style Necklace White /
Retro Style Fashionable Design Perfect Necklace /
Retro Style Flower Decorate Long Sweater Necklace Gold


Prize: ●●●●●●●●●●
2.05$ / 1.76$ / 1.35$ Awesome prices!
Color: ●●●●●●●●●◦
They looke exactly the way they're portrayed (colorwise).
Material: ●●●●●●●◦◦◦
Mostly cheap material and plastic, but what do you expect for 2$ :)
Fit: I'll leave that category out here, wouldn't make much sense.
Total: ●●●●●●●●●◦
9 out of 10 points. They're exactly what you expect. Really nice, cheap necklaces, combinable with a lot of stuff and for different occasions.


What i should warn you about, especially if you order from Europe, they charge really high shipping costs! The only way to keep them down is by ordering via Chinamail, which takes 50-80 days (d'oh!). They deduct the shipping costs from the 'weight of the ordered items', which are sometimes totally inaccurate if you ask me.
Also, i ordered via DHL, it says it takes 2-4 days, but it took them 4 days to even prepare my order, I've waited over a week now. So don't rely on that.

Second thing that i didn't really like was that, after I ordered, one item wasn't in stock and they just gave me the amount of money in credits to shop on the site.
So make sure you change your settings, so they refund your money instead of giving you credits.

Summarizing I can say, all in all it wasn't a bad experience. You get what you pay for (in quality/prize). It's not expensive, well-made stuff, actually cheap replicas, but they work for me.


xoxo, the nerd

2011/10/07

pastel stripes and flowers

hello nail art addicts

some days ago we posted a picture of beautiful pastel stripes and flower nails. the nerd already showed you how flowers are done and a way to make some cute nails with flowers. today i tried myself on those pastel ones. i think they turned out pretty cool and i'll show you today how they're done.

first a list of what i used:


- essence top coat - that i use as base coat, cause in the end it's the same :)
- light rose, dark rose (the one that looks orange here, sorry about that) and a light green by claire's
- essence nail art pen in green and pink
- white by mny

ok. so after you applied the base coat, you put the background for the later design on. thumb, middle finger and the pinky are in light green, index finger and ring finger in light rose. the essence colours are pretty covering but maybe you'll need to add a second layer, depending on what brand you use. 


when everything's dry, we can start with the petals of the flowers. i used the dark rose first. just make 3 little dots, which are 3 out of 5 petals. don't worry if they're not even or something, later no one will notice that, because the nails just look too AWESOME ;)


afterwards you take the light rose and make two further dots. i put them a bit over the dark ones, like the pansy has it. 


then you should let those drops dry a bit. i made them with a very thin brush, but of course you can also make them with something else. i have pretty small nails, so i needed something for making very small dots. 
the next step, while letting them dry, we go to the light rose painted nails and do the white stripes. i used an old eye liner brush (just wash it out completely before using. you don't want any black on it, especially not when using white afterwards). just make vertical lines in white. they won't be completely straight unless you have super still hands ;) don't worry about that. as you can see i also made a white dot in the middle of the little flower, as i was already using the white polish. 


now's the time where you really need to let them dry, as you don't want to smudge what you already have. i let it dry about 15 minutes. 

afterwards i took the essence nail art pen in green and pink. with the pink one i made two little dots next to the white one, to give the flower a bit more depth and real look. with the green pen i made some leaves coming out of the flower. i added them randomly, sometimes two sometimes three. it doesn't matter, just do it however you like it the best.


okidoki, now you're done! :D my endproduct looked like this


i really like them and even though it's not exactly the same as in the pic we posted some days ago, they are incredibly cute. 

i hope you enjoyed the tutorial. if you try them, let us see your pics! we'd love to have some feedback.
xoxo, the beauty

2011/10/05

>>

Good Evening my dears :D

I just wanted to announce my next project;
It's gonna be DIY balcony decoration, since i got some old furniture from the beauty ;) and I think it needs some refreshing.
Stay tuned!
xoxo
the nerd

Little Yellow Flowers

Good Morning!
As we have posted last time, we saw some bautiful flower nails and wanted to try them ourselves. I did one with flowers, but not the same as there was in the other post.
I did it for the first time, didn't turn out bad but could get better.
Here's how it works and how it turned out.

You can choose the colors for the flowers yourself, I just liked the light yellow paired wth the mint green.

You'll need:
>light yellow polish
>darker yellow polish
>mint green polish
>white polish
>top- &basecoat
>green, white &purple nail art pens

So. As for step 1, apply the basecoat. (getting oooold, but i think as of now you should know to always do that first.)
When it dried, do a layer of white. Depends on what white polisch you use, but in my case (MNY White) I needed to do a second white coat. I didn't want it to be opaque white, just a little see-through base. Let it dry.
It doesn't have to be perfect, as you can see, you can remove the 'leftovers' later.


2nd step: You draw a little flower on your nail, just right where you want it, with the light yellow (H&M 'going bananas') or whatever color you chose. It doesn't matter if the petals are't the same size, cause natural flowers aren't symmetric either ;)


Once again, let it dry.

3rd step: apply the darker yellow polish (H&M 'being on the A-list') on the lower part of the flower, just so the petals look a little more 3dimensional. Don't brush it on, instead just 'tip it' until it covers the area you want.
I'm not going to tell you to let it dry every time, it should be clear that you let your polish dry after every step.


When it's completely (!) dry, take your white nail art pen (Essence 'French manicure white tip painter') and draw small highlights on the upper side of the flower, and, as you wish, on the lower part.


Once you're done, you can do the additional thing i did; little mint green leaves.
Take your Mint polish (L.A. colors 'green satin') and just draw little leaves, coming in from one side of your nail. To do that, start with the broad side of it und just slowly release the pressure on the brush, to let it end in a little tip.


To finish it off, i added white stripes on one nail i left white with my nail art pen. I also painted little green leaves besides the flowers with my nail art pen (Essence nail art pen 'fresh green'), that way you can 'overpaint' petals that look too big. Additionally i did little points in the middle of the flower with my nail art pen (Essence nail art pen 'sweet berry'), to make it look even more 3dimensional.
That's how it turned out:


It was my first try, I don't think it turned out bad, though on second thought i'd leave the mint leaves away.
Anyway, next time it will turn out alot better, be prepared :D